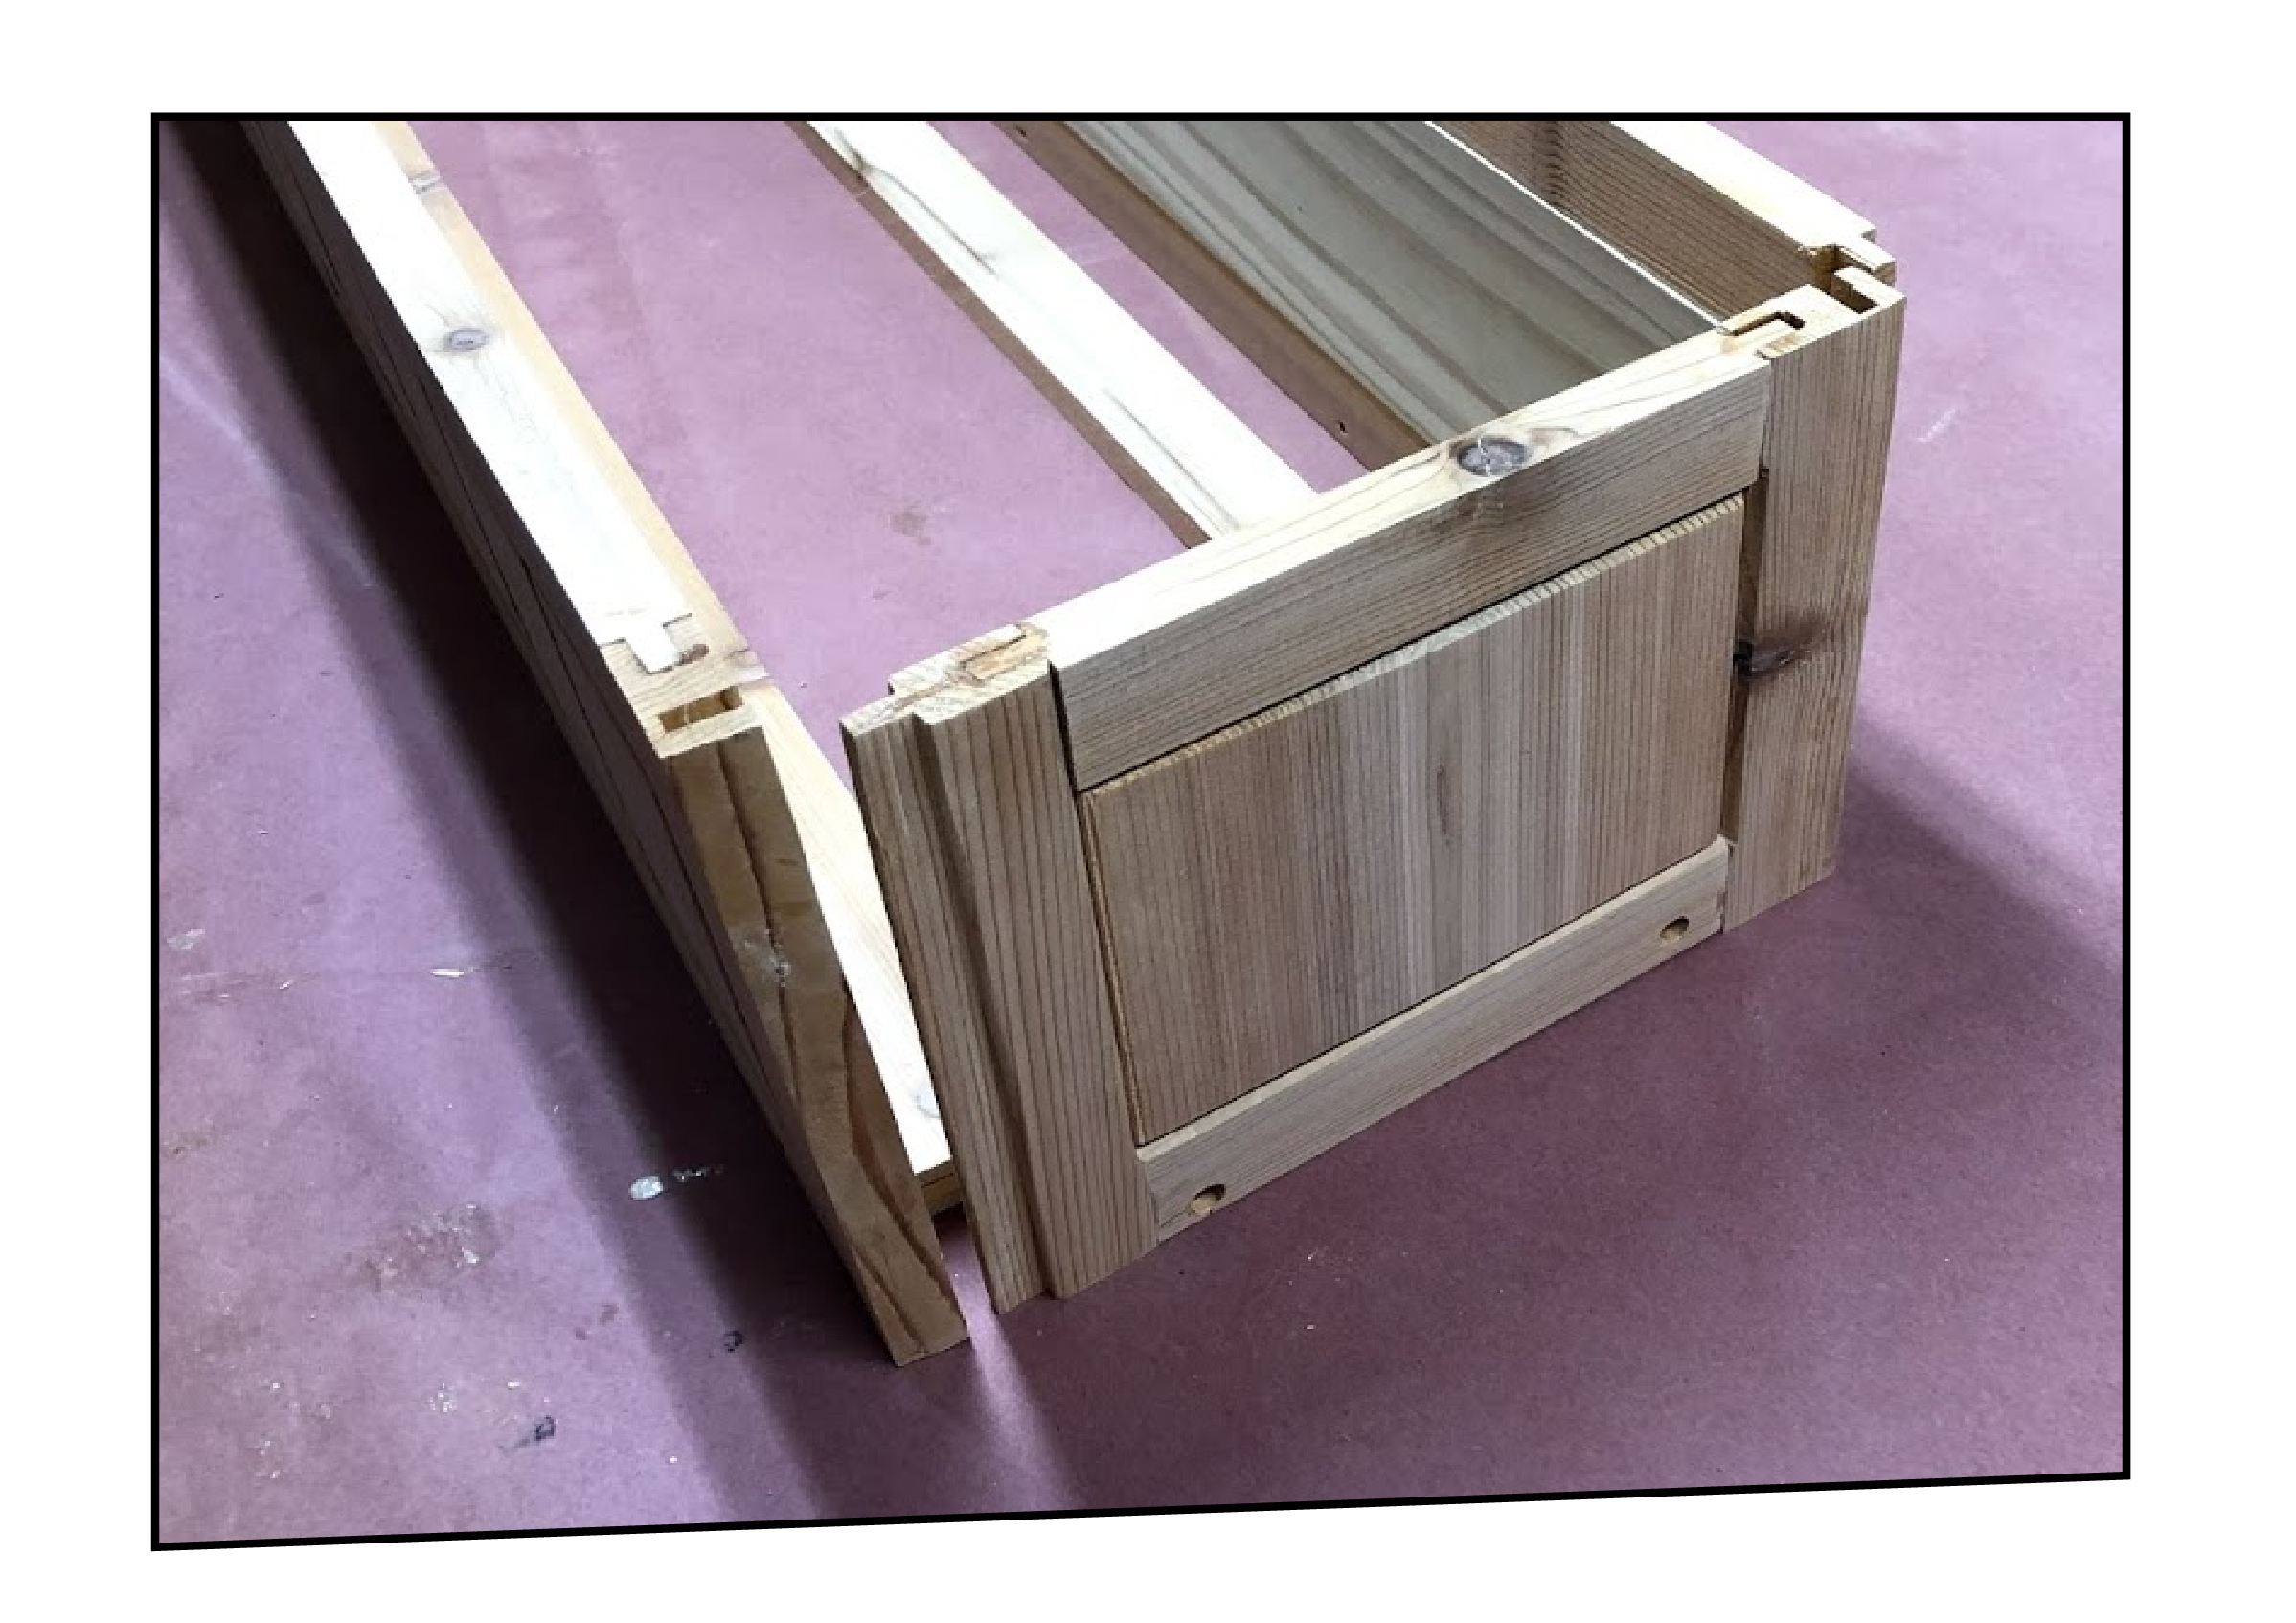
36" Window Box

WINDOW BOX'S: ALL FINISHED

Well this weekend finally saw me complete all 3 window boxes. I made 2 different sizes and used 2 different wood types let me go into a little more detail about them.

CEDAR WINDOW BOX

The first window box that I made I used cedar wood to make it, I used frame and panel construction techniques to make it. It is also the largest of the 2 sizes of box that I made at 40'‘ basically because I had to purchase a long cedar board so I decided to use the entire board and have no scrap left over.

The joinery I used was traditional tongue and groove with inlaid panels on the front and sides of the box. I used frame and panel construction because it allowed me to incorporate more design features into the aesthetics of the window box. I was able add grooves to the panels that made up the front and sides to further enhance the look of the box and not just have solid wood panels beside each other and to be hones I really like the look of the window box and its very pleasing to the eye.

I also used plastic liners to go into the box so as that I could remove the it in order to put plants into the them then just place it back into its home.

To mount the window boxes I purchased some black Roth iron L brackets and secured them to the balusters on the front porch. and then just screwed the planter onto them.

Below is a compilation of pictures with the finished window box. Also I did make an entire set of plans for both size boxes and I will post them soon I just need to tweak a few things to make them ready.

PRESSURE TREATED WINDOW BOX

The pressure treated window box was made because I decided to make a few more and to be honest the cedar was such a difficult wood to work with as I got in the local home center anyway these windows bocxxes are basically made the same way as the Cedar one that I made with a few slight differences and that basically is they are only 24” long as I didn’t need them that long but the everything else is the same from the parts to the joinery and method of construction all the same.

These 2 window boxes were to be housed off the back deck in my back yard and will be mounted to the deck fence basically in the same manner as the cedar one I made for the front porch.

These window boxes also cost a lot less than the cedar and to be hones they look as good as the cedar one with a lot less of the construction headaches I had using the cedar.

IMG_1099.jpg
IMG_1097.jpg
IMG_1091.jpg
IMG_1095.jpg

I will be selling plans that I made to make these window boxes soon I just need to finalize them, well thanks for reading this article. I did make a project blog on making the larger cedar window box if you would like to read it I will leave a link below.

WINDOW FLOWER BOX : PHASE 6

Well with all the separate assemblies all complete its now time to make the sides, front 7 back into 1 box and that is what I will be doing in this final Phase of the project as well as a few other steps to ready them for the great outdoors.

Here is what I did in this Phase.

  • Predrilled for Screws

  • Glued Up the Box

  • The Removable Base

  • Made & Attached the Top Trim


PRE-DRILL HOLES

So to secure the base frame to the inside of the window I opted to use exterior grade construction screws going through the outside faces of the window box. So as I often do I counter-sunk screws theough pre-drilled holes then came back and added wooden plugs to hide the holes and screw heads. I used the same wood species of wood as the box so as that it would not be that noticeable.

IMG_1020.jpg
You can hardly see the cedar wood plugs they blend right into the faces of the box, just what I wanted.

You can hardly see the cedar wood plugs they blend right into the faces of the box, just what I wanted.

GLUE-UP

So the glue was pretty straight forward. A lot of the window box didn’t get any glue as I needed the panels in the front and sides to be floating in the grooves, that way it had the freedom to expand and contract with the seasonal humidity. So the only parts that got glue was the tenons on the ends of the rails all around the box.

IMG_1022.jpg
IMG_1023.jpg
IMG_1028.jpg

THE BOTTOM

The bottom couldn’t be any easier to make its basically a board cut to fit inside the walls of the window box, and to allow for water drainage I drilled 3 holes about 1-1/2” in diameter, later I came back and rounded over the holes using my palm router but sorry no picture. The bottoms basically sits on the base frame we made with the bridal joint in Phase 5, its not secured in any way.

ADDING THE TOP TRIM

There is just something very clean when trim is added to a project so I decided to add trim to the top of the window box and again I used cedar so as to make it blend in with the rest of the box. I mitered the corners at 45° using my chop saw and then used glue and brad nails to secure the 3 pieces to the top of the box. I didn’t use any trim to the back as it would not be visible. I also made some cedar wood putty to cover all the brad nail holes in the trim this is something I do periodically you basically use some very fine sawdust of the species of wood you are using and then add wood glue to the dust which creates a paste then basically apply the putty to the are let dry then sand away the leftovers and it hides everything.

IMG_1032.jpg
IMG_1036.jpg

Well that wraps up phase 6 phase of the project I really hope you liked this project blog and it gives you some inspiration in making your next project. Although this project deals with me only making the large 40” window box I did make 2 more smaller boxes but these box are different as they are smaller at 24” and I used pressure treated lumber for their construction.

ALL FINISHED

ALL FINISHED


WINDOW FLOWER BOX : PHASE 5

We are almost ready for the window box to get glued up but first I needed to create a base supports that they flower box bottom will sit on.

The Bottom support is made up of 4 pieces, 2 short sides and 2 long front & back pieces. I also changed up the joinery method to what is called a bridle joint. This joint is very strong and allows for more glue to be used where all the corners meet.

Here are the steps I took in making the bottom:

  • THE PARTS

  • WHAT A BRIDLE JOINT LOOKS LIKE

  • CUT THE BRIDLE JOINT

  • DRILLED SOME HOLES

  • TIME FOR DOWELS

  • GLUE-UP

THE PARTS

As you can see the bottom support has 4 pieces, 2 sides, front & back. The bottom support pieces are all joined using a bridle joint and you can see a closeup of the joint in this diagram. The actual bottom is just a piece of wood that is cut to size and just sits on this bottom framework. The bottom supports are basically held inside the window box using screws that I secured through the outside pieces of the box.

Screenshot - 5_28_2019 , 3_59_51 PM.png

THE BRIDLE JOINT

Here is the image of my bridle joint , yes I know its messy looking with all the glue and debris on the parts but its not sanded yet. If you would like to know how to cut such a joint I found a very useful article online hat will help.

IMG_1006.jpg

EXPLODED VIEW OF JOINT

Here is an image before I glued up the parts that make up the base support, you can see how the parts fit into each other. I accomplished this using my dado stack in my tablesaw to remove the different sections of waste that make the joint fit together. I am a big fan of this joint because its very strong and I needed it to be strong as a very heavy planter box will be sitting on it.

ADDING DOWELS

I also decided to add a dowel to the bridle joint to further strengthen the joint, this is very simple to do you basically drill a hole to fit whatever size dowel you will be using in my case it was a 1/2” diameter. so I drilled a through hole through one side of the bridle joint to the other side, then came back I tapped in my half wide dowel. Once the glue was added I came back with my flush cutting handsaw to trim both sides of the dowel and then sanded.

IMG_1009.jpg

ADDED THE DOWELS

Leaving the dowels proud of the surface gives me the opportunity to flush cut the dowels

IMG_1011.jpg

DOWELS FLUSHED TO THE FACES

Using my flush cutting saw I cut the excess dowel on both sides of the hole then used my sander to make everything nice and flush and smooth.

IMG_1013.jpg

BOTTOM SUPPORT ALL FINISHED

Here is the finished part, although this part will never be seen I am glad I took my time in preparing this part because what good is a box if a bottom falls out of it.

IMG_1012.jpg

THE BOTTOM PANEL

The bottom panel is basically a board cut to size and has 3 drainage holes cut into them.

IMG_1030.jpg

DRY ASSEMBLY

Now that all the parts of the box are all finished its time to see how all these parts are going to fit together, so I decided to do a little dry assembly to make sure everything fit the way I intended it to.

Here you can see how the back and front of the window box will fit into each other.

Here you can see how the back and front of the window box will fit into each other.

Well that wraps up phase 5 of the project and we are no ready for the next and final phase. In the next phase I will be gluing the window box sides together and adding the top trim to the box.

Catch you then.

WINDOW FLOWER BOX : PHASE 4

Phase 4 deals with the back of the flower box and its a pretty simple step. I could of done the back the same as the front but I opted just to use a solid wood panel for the back panel as it will not be seen since its going to be mounted to a fence.

Here are the Steps I took in making the back:

  • The parts

  • Joinery

THE PARTS

As you can see by the diagram the back panel is basically 3 pieces. Atop and bottom rail and a center panel. I chose to use a pressure treated panel for the back as it will not be seen but the rails are both made from cedar.

Screenshot - 5_28_2019 , 3_37_13 PM.png

THE BACK JOINERY

Basically the joinery is the same as the rest of the box. I added tenon’s to the left and right ends of both rails as that joint will be used to house the back into the left and right sides. Both rails also received a groove that will hold the center panel. The groove as you can see is centered on the rails thickness and is 1/4” wide x 3/8” deep. The back panel itself also has rabbet’s cut around all 4 sides of the panel on both the front and back faces this created a tongue that will then fit into the rails and sides of the window box.

Screenshot - 5_28_2019 , 3_41_09 PM.png

ALL MILLED UP

Here is an image of the back all milled out and ready to be glued together. The only parts of the back that are glued are the tenon’s on each end of the rails, the panel floats inside the grooves in the rails to allow for seasonal movement.

IMG_1015.jpg

EXPLODED VIEW OF BACK

Here is an image at a different angle of the backs components, you can also see the tongue that go around the entire perimeter of the panel. This panel doesn’t really get any glue until I am ready to glue the box together.

IMG_1014.jpg

Phase 4 is a wrap and it really didn’t take that long to do, there was not even a glue up to do as this does not happen until I am ready to do the window box glue up.

Next up is making the bottom supports and base

WINDOW FLOWER BOX : PHASE 3

So now that I have made both the left and right sides of the flower box Phase 3 deals with the Front of the Box. This phase probably has the most work since its the most visual piece of the box. In some ways the front bares some similarities to the sides in that it is basically a frame and panel design but with a lot more panels.

I broke this phase down into the following steps:

  • The parts

  • Joinery of the Stiles and Rails

  • Making the panel

  • Additional Joinery

  • Some Router Work

  • Assembly

THE PARTS

There are quite a few parts to making the front and they are:

  • Left & Right Stiles

  • Top & Bottom Rails

  • 10 Panels

    Below you can see the plans and the actual workpieces I needed to make the front.

Screenshot - 5_25_2019 , 2_23_51 PM.png
FRONT LABELED.png

JOINERY OF THE STILES & RAILS

CUTTING THE GROOVES

Just like I did in making the sides the front is basically the same, I needed to cut grooves on both rails and both stiles, the only difference in making the front is that the rails are a lot longer.

Although I am showing the rail in this image its because I need to cut a groove along the inside edges of the all parts. Basically a groove is cut on the center of the workpiece and is cut all the way along its edge.

The groove is 1/4” wide x 1/2” deep and centered on the workpiece thickness, although I thought the workpiece was 3/4” thick its evident here that its not but that was my problem to remedy and hopefully your stock is actually 3/4”.

To cut the groove I installed a 1/4” wide dado stack blade in my table saw and move the rip a 1/4” away from the blade.

The grooves are cut because I will be fitting the center panel inside this frame work .

IMG_0987.jpg

CUTTING THE RAIL TENONS

My next piece of joinery to do only applied to the rails as this is how I closed the panel off, I needed to cut a 1/2” long tenon. In this image you can see that I have my rails in a horizontal position and is back up by my miter gauge and sacrificial board to back up the cut (this reduces tear-out).

In my table saw I widened the dado stack to 1/2”, and lowered the depth of cut to 1/4” and made 2 passes on each end of the board and it revealed the tenon. This tenon is housed in the grooves that we already cut into the edges of the stiles.

front rail tenon.png

THE INSIDE PANELS

To complete the frame and panel front of course we need to make the panels as there are 10 of them in total, in the previous steps we created grooves on the inside edges of the rails and stiles, these were cut to house the center panel.

As you can see I have the panel laid flat on the table saw and in the saw I have a 3/8” wide dado stack raised a 1/4” high and a sacrificial board attached to the rip fence so I don’t damage my fence). Next I run all four edges on both faces of the panel to create a tongue, these tongues on all four sides of the panel get housed in the grooves.

Although there are a total of 10 panels that make up the front 9 of the 10 are the same but the last panel is different because there is no groove cut into the right side, instead it has a tongue so the difference from the other panels is that there is a centered tongue on all 4 sides of the panel so as that it can fit the stile on the far right hand side of the front assembly.

IMG_0931.jpg
Here is an image of how the panels all fit together.

Here is an image of how the panels all fit together.

ADDITIONAL JOINERY

Since I needed a method of joining the side to the window box back and front I needed to create a joint so as that when it came to gluing up the box everywhere had a home. So I needed to cut some more grooves. In this image you can see the left stile on its face about to receive the groove that the back will connect into. Again this groove is positioned a 1/4” from the edge and is again a 1/4” wide x 1/2” deep.

IMG_0981.jpg

ADDITIONAL JOINERY (Part 2)

You can see the connection pints that I needed to make to the front, As you can see I needed to cut an additional groove on the back side of right stile, this enabled the right side to be connected into the front assembly.

2.5.png

SOME ROUTER WORK

Although this is an optional step and could of simply left the side panel all flat and no character to it with a basic frame and panel design and sometimes I quite like that look. This time I decided that I wanted to define edges of the inside panel and make it stand out some more. So I used my router installed with a “V Groove” router bit.

THE STILES

These parts are some what more demanding because I don’t want to route the entire edge of the part, I only wanted the parts that came in contact with the panel visually. This is called a stop routing ad there are a ton of articles online on how to complete it the task.

IMG_0978.jpg

THE PANEL ROUTING

Routing the panel is easy enough as I just need to route the edges of the panel make sure your not routing the tongue as that will be hidden, add the router profile to what is left and will be exposed on the side. I just lowered the bit in the router table and just the right side of the bit is kissing the panel.

IMG_0997.jpg

ASSEMBLY

THE GLUE UP

The only part of the front assembly that was to receive glue was the tenons on the top and bottom rails, this is because I wanted the panels inside the frame to be able to move, as I already documented season humidity can shrink and expand wood so as to avoid the panel splitting it moves freely within the rails and the stiles.

CLAMPING THE PANEL

Here you can see the front panel all assembled and the glue applied to the tenon’s, I used a decent amount of clamps to keep everything aligned and in the end I will have a very decorative front panel .

IMG_0995.jpg

Well that wraps up Phase 3. I now have both sides and the front completed, all that is left to do is to make the back and bottom framework and then it will all be ready for the assembly phase.

WINDOW FLOWER BOX : PHASE 2

Phase 2 of the project deals with the Left & Right Sides. Basically the sides are made from 5 parts and if your familiar with Frame & panel construction you can make them easily.

I broke this phase down into the following steps:

  • The parts

  • Joinery of the Stiles and Rails

  • Making the panel

  • Additional Joinery

  • Some Router Work

  • Assembly

THE PARTS

The side is made up with the following parts:

  • Left & Right Stile (Vertical Pieces)

  • Top & Bottom Rails (The Horizontal Pieces)

  • 1 Panel (Basically the inside of the frame)

Here you can see the left side and its labeled parts, the right side has the same parts but the joinery positioning is a little different, but Ill get to the joinery a little later.

Here you can see the left side and its labeled parts, the right side has the same parts but the joinery positioning is a little different, but Ill get to the joinery a little later.

JOINERY

The stiles are the left and right vertical pieces of the side and these all need a groove cut into the edge of the boards thickness spanning the entire length of the part. Although I will cutting the same groove into these parts its crucial that you place the groove on the correct edge or the joinery will not come together to wrap the panel and house the rails.

CUTTING THE GROOVES

Although I am showing the stiles and rails in this image its because I need to cut a groove along the inside edges of the all parts. Basically a groove is cut on the center of the workpiece and is cut all the way along its edge.

The groove is 1/4” wide x 1/2” deep and centered on the workpiece thickness, although I thought the workpiece was 3/4” thick its evident here that its not but that was my problem to remedy and hopefully your stock is actually 3/4”.

To cut the groove I installed a 1/4” wide dado stack blade in my table saw and move the rip a 1/4” away from the blade.

The grooves are cut because I will be fitting the center panel inside this frame work .

IMG_0933.jpg

CUTTING THE RAIL TENONS

My next piece of joinery to do only applied to the rails as this is how I closed the panel off, I needed to cut a 1/2” long tenon. In this image you can see that I have my rails in a horizontal position and is back up by my miter gauge and sacrificial board to back up the cut (this reduces tear-out).

In my table saw I widened the dado stack to 1/2”, and lowered the depth of cut to 1/4” and made 2 passes on each end of the board and it revealed the tenon. This tenon is housed in the grooves that we already cut into the edges of the stiles.

IMG_0937.jpg

THE INSIDE PANEL

To complete the frame and panel side of course we need to make the panel, in the previous steps we created grooves on the inside edges of the rails and stiles, these were cut to house the center panel.

As you can see I have the panel laid flat on the table saw and in the saw I have a 3/8” wide dado stack raised a 1/4” high and a sacrificial board attached to the rip fence so I don’t damage my fence). Next I run all four edges on both faces of the panel to create a tongue, these tongues on all four sides of the panel get housed in the grooves.

IMG_0932.jpg
Here you can see the profile of the panel, the top and underside of the panel is removed creating a tongue.

Here you can see the profile of the panel, the top and underside of the panel is removed creating a tongue.

ADDITIONAL JOINERY (Part 1)

Since There are 4 sides to any box I needed a housing method to find homes at all 4 corners of the box, in this illustrated diagram you can see the left and right stiles (pink) and where I needed to locate the groove and tongue so as that I could complete the joinery of the back and front of the box

additional joinery 2.0.png

ADDITIONAL JOINERY (Part 2)

Since I needed a method of joining the side to the window box back and front I needed to create a joint so as that when it came to gluing up the box everywhere had a home. So I needed to cut some more grooves. In this image you can see the left stile on its face about to receive the groove that the back will connect into. Again this groove is positioned a 1/4” from the edge and is again a 1/4” wide x 1/2” deep.

IMG_0981.jpg

ADDITIONAL JOINERY (Part 3)

I am most definitely jumping ahead using this image but you can see the connection pints that I needed to make to the sides, The left side stile shows a tongue and the right side stile shows the groove this is how I attached the front and back of the box to the left and right sides.

additional joinery 3.0.png

Here is the completed side panel with the router groove all cut into the center of the assembly.

Here is the completed side panel with the router groove all cut into the center of the assembly.

SOME ROUTER WORK

Although this is an optional step and could of simply left the side panel all flat and no character to it with a basic frame and panel design and sometimes I quite like that look. This time I decided that I wanted to define edges of the inside panel and make it stand out some more. So I used my router installed with a “V Groove” router bit.

THE PANEL ROUTING

Routing the panel is easy enough as I just need to route the edges of the panel make sure your not routing the tongue as that will be hidden, add the router profile to what is left and will be exposed on the side. I just lowered the bit in the router table and just the right side of the bit is kissing the panel.

THE STILES

These parts are some what more demanding because I don’t want to route the entire edge of the part, I only wanted the parts that came in contact with the panel visually. This is called a stop routing ad there are a ton of articles online on how to complete it the task.

Here is an image of the “V GROOVE” bit in the router.

Here is an image of the “V GROOVE” bit in the router.

Here you can see the subtle little groove cut on the right side edge, but boy does it make a difference.

Here you can see the subtle little groove cut on the right side edge, but boy does it make a difference.


ASSEMBLING THE SIDES

Assembling the side was a pretty simple affair I basically applied glue to the tenons on the rails and installed them into the left and right stiles. This is the only glue that I applied to the entire side and there is a good reason. I wanted the inside panel to have freedom of movement because of seasonal humidity, these climate changes can break apart a project because wood expands and contracts within different seasons, and I needed the center panel to have that freedom to move within the frame work.

ORIENT THE PARTS

I usually do a dry assembly of the parts and rehearse the glue up, but this wasn’t really necessary as the glue up was small.

IMG_0973.jpg

ALL CLAMPED UP

Here you can see both the left and right sides all glued and clamped up I left this to dry overnight.

That wraps up Phase 2 of the project and the sides came out ok I was happy enough with them but this cedar is proving difficult but I am satisfied with how they came out. Next up is assembling and making the front of the box, this phase most definitely has the most work to it but it has a lot of similarities to the sides as it is just a much bigger frame and panel.

WINDOW FLOWER BOX : PHASE 1

With Summer around the corner I decided to make some new window boxes, I am using Cedar wood on the first box and see how I fair with it. To be honest the Cedar wood that I get from the bog box store isn’t usually that great, but I really love the look and smell of the wood.

I needed to make a total of 3 boxes with 36” & 24” widths I will be using plastic liners to put the actual plants into so I made my box dimensions according to that.

To be honest I could of made quick work of this project and basically screw 4 boards together and screw in a base and call it a day, but in keeping with my fine woodworking endeavors I chose a more elaborate design.

WINDOW BOX FEATURES

  • Frame and Panel design

  • Tongue & Groove Joinery

  • Top Trim to cover all the exposed joinery edges.

  • Rail, Stile & Panel construction techniques.

As I usually do I will be breaking this project down in the following parts:

  • Research & Design

  • Materials Needed : 36” & 24” Sizes

  • PHASE 1: First Things First : Ripping & Crosscutting

  • PHASE 2: The Sides

  • PHASE 3: The Front

  • PHASE 4: The Back

  • PHASE 5: The Base

  • PHASE 6: All Finished

RESEARCH & DESIGN

Although I did quite a lot of research online I could not find exactly what I wanted in 1 project so anytime that happens I design the project on Sketchup and tweak certain things to make it my own. The window boxes do contain certain characteristics of some project that I found online but all in all this is my design. I was originally going to use sliding dovetails as the primary joinery method but after purchasing the cedar I decided against it as the cedar was not exactly 3/4” and I wanted to use a 1/2” dovetail bit. The cedar was 1/8” narrow than 3/4” and it was quite brittle so I decided to go with tongue & groove joinery.

Below you can see my Cover page Images, I did make a very detailed set of plans to help make this project and these are what the window box will look like. This blog details me making the 36” Cedar Window Box. The 24” wide window box will not be made using Cedar, Ill explain later. But both boxes will be made using the same joinery and woodworking techniques.

Screenshot - 5_23_2019 , 3_11_38 PM.png

MATERIALS NEEDED

So like I said I will be making 2 sizes of window box and here is what you need to make either size.

36” WINDOW BOX

  • 12 FEET OF CEDAR

  • 8 FEET OF PRESSURE TREATED LUMBER

  • TITEBOND III GLUE (or any waterproof glue)

  • 1 5/8” Stainless steel screws

24” WINDOW BOX

  • 16 FEET PRESSURE TREATED WOOD (Didn’t use Cedar)

  • TITEBOND III GLUE (or any waterproof glue)

  • 1 5/8” Stainless steel screws

Here a the materials that I needed to make the window box.

Here a the materials that I needed to make the window box.

Here is the wood glue and steel screws, I wont need that many screws maybe 10 or so.

Here is the wood glue and steel screws, I wont need that many screws maybe 10 or so.


FIRST THINGS FIRST : RIPPING & CROSSCUTTING

The way that I designed the window box looks awesome but it has one downside there are so many pieces to rip and crosscut. I even set up my cultist into so many sections I had to number my boards so Icut the correct components of the correct boards, but once I got going I made quick work of this. I think when I was done I had almost 40 parts to the project.

RIPPING

I made sure to keep all my board widths the same and that was a 1-1/2” wide so I followed my cut list ripped all the boards into easier to manage strips. In this image you can see my tablesaw set up to cut 1-1/2” cuts. For those of you that are not aware with some of the terminology, Rip cuts are long cuts made with the grain, and crosscuts are those cut across the grain.


IMG_0922.jpg

RIPPING (PART 2)

Here you can see the cedar sections ripped to 1-1/2” wide there are some wider cuts to make but they are for the back and bottom of the box and a few other components. If you use my plans to make this box all these are laid out for you. To make sure that I knew what board went with what cut list diagram I placed my actual plans on the appropriate boards, so when it came to crosscutting them to final size I had a guide to help me.

IMG_0921.jpg

CROSSCUTTING

I am lucky enough to have a dedicated miter saw station that really comes in handy when I have a ton of repeat cuts, here you can see my miter saw with a stop block set to the desired length that way I just place my stock against the stop block and cut to hearts content, there were a few different lengths that I needed so I just cut all boards that were the same size and then adjusted the stop block for the next size on the list, this way you can guarantee the pieces are of uniform length.

ALL CEDAR PARTS ARE DIMENSIONED

Here you can see all the cedar parts to their final dimensions and again you can see my cut list plans under some of the parts so as that I know what each part is for. I did still need to work on the pressure treated wood but I decided until the window box frame was finished before I cut that up.

IMG_0969.jpg

CHANGE UP; NOTIFICATION

Well Phase 1 is all wrapped up and I well on the way of making some pretty stunning window boxes. Before I go further with this blog, I just wanted to let you know why I chose not to use cedar on the smaller boxes and that was because it was a nightmare to work with, the cedar was under dimensioned it was supposed to be 3/4” thick but realized it was 5/8” thick and played havoc with my joinery dimensions, this resulted in some joints far too loose and some too tight because I usually deal in thirds when tongue and grooving, this under dimensioned stock resulted in some pieces cracking as the wood was extremely light and had little robustness to it. So although I completed the window box and it looks great, it should have gone a lot easier and a lot less hair would have been pulled out. So if you choose to make the window box out of cedar make sure that it is at the least 3/4” thick, thicker would be better. But there you go.